

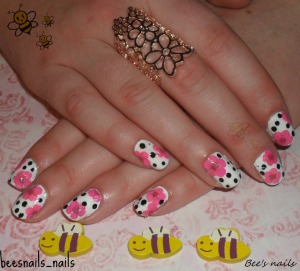
So today I decided to dig through my nail art stash (scary right!), well for someone who only started nail art in October 2014 I have a lot of stuff so putting myself on a no buy (which I have broken all ready opps 🙂 ) But anyway I found these dried flowers in the back of the draw and wanted to give them a try. I wasn’t sure what to do with these so I looked up pictures on google so this design is not one of mine but I’m not sure who came up with this first as there was so many pictures.For this manicure you will need; a top coat, I used L’oreal Paris clear (I run out of top coat; I know should never happen but that is what happens when your unorganised and have three bank holidays in a row so all the shops are closed)
For this manicure you will need;
- a base coat; I used Make Up Gallery, well polished ridge fillar and base coat
- a white polish, I used Sinful Colours, Snow me White
- a black polish, I used Kleancolour Madly Black
- dried flowers
- tweezers
- wax crayon (optional but this is what I found easiest to apply my flowers)
- scissors (if you need to cut the flowers to fit bettr on your nail)
- dotting tool
- clean up tools (cotton bud, clean up brush, nail polish remover….)
So I started like always by applying my base coat, I get a lot of questions about the base coat I use and there are a few different but at the moment I use 2 in particular the one I use the most is Poundland’s Make Up Gallery, well polished ridge fillar and base coat and then once a week I use my Rimmel London Growth Protector as it really does strength and helps grows my nails.
After applying my base coat , I apply two coats of my white polish making sure each layer is try before going to the next, I apply a layer of top coat to stick on my flowers.
Dried flowers are fragile so be carefully not to tear any of them; I struggled at first to place the flowers as I had trouble picking them up but I worked out using my wax crayon worked better than anything else. I placed the flowers cutting some in half to make them fit onto my nails. Every now and then you may need to use your finger to push the flowers down flat against the nail. When you have placed your flowers apply a layer of top coat. (You do use a lot in this design to seal in the flowers).
After applying my flowers I decided I wanted to put on polka dots so I took my dotting tool and a black polish, I decided to make my polka dots different sizes to give this design I little but more dimension, I find that by having my polka dots different sizes it makes them pop a little more.
I applied another layer of top coat to finish the design.
I think this design is really pretty but dried flowers really aren’t for me, I’m not really a flower girl and not sure why I got these in the first place but I’m glad I tried them and I can see for a summer party this could be a nice design.
I’m going to be working out of the country for the summer so my schedule might be a little unusual, I’ll try to upload a post and a video once a week and will do my best to answer comments but I apologize in advance if I’m absent at any period this summer.
I hope you all have a great summer!
Happy Nail Art!
